On the 21st of June I attended the PDU (Professional Development Unit) Graphics intermediate course on Paint Shop Pro Version 7 (PSP) offered in the university where I work.
Having attended the first workshop called Graphics Fundamentals, I didn’t really learn all that much about the potential of the program so I registered for the next workshop which opened my eyes to what I originally thought was a pretty basic program.
I was quite surprised about some of the features that were available in PSP as I am not familiar with the PSP program. Photoshop is predominately what I work with here in the office.
Firstly, PSP offers the user the option of using vector or raster-based graphics as well as a combination of both in one artwork by letting them choose vector or raster layers. Vector and raster options in PSP make it easier for the user to integrate graphics without having to import their graphics into other programs in order to complete the finished product. However one of the main let downs is that once a shape has been created as a raster image, it remains as it is and the user can only move it around the canvas. If the shape needs to be bigger or smaller they have to do the shape again. If the user uses a vector-based image the user can easily change the size and colour.
Another let down for the raster versus vector in PSP is that photographs and graphics are not easy to combine together. For example, if the user wanted to place a photograph inside a raster star shape the user must resize the original photo before they try pasting it on the canvas. This is because raster layers can not be re-sized. This is a major let down.
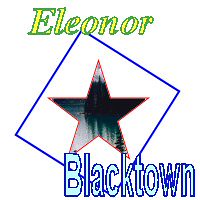
PDU Graphics Intermediate exercise although I experimented with putting in a photo.
Users of Photoshop would be familiar with the PSP layout. It has similar palettes such as tools, layers, materials (the equivalent of Photoshop’s foreground and background selections) as well as more palettes that Photoshop users would be accustomed to.
The feature which I found most interesting was in the Materials Palette where the options of colour, gradient, pattern and texture were readily available for the user. These options allow the user to experiment more freely with the numerous presets which are offered in each category. The user can even combine any of the colours, gradient, pattern and texture together. Making customised colours, gradients, patterns and textures is also possible. These combinations can then be used with various tool palette options like airbrush, paintbrush etc. The only let down to this option is that combining presets limits the user to changes later on.
bricks texture with colour red

two patterns mixed together by using the tolerance function
A feature in PSP’s tool palette is what they call picture tubes which are a number of different pictures built into the program which you can use in your image. In essence it is like a rubber stamp. The user chooses the picture and then chooses the scale and step of it on the canvas. One can also make up their own custom stamps which is handy for easily placing small graphics which are intended to be used over and over, or even company logos.
Picture tube experiment. Made up of billiard balls, lightning and waterdrop presets
Another feature in the tool palette which is different to Photoshop is their Flood Fill option which is equivalent to the Paint Bucket in Photoshop. However the Flood fill tool in PSP fills area with not only colour but textures, patterns or gradients! Or even a combination of them all! Don't forget those customised ones as well. The Flood Fill selects the Pixel it is over when the user clicks the mouse and fills it (and any adjoining pixels depending on the tolerance) with the fill type that the user specifies. The tolerance is the amount of pixel space that you want to select from the place you want to click on. The higher the number the larger the selected area.
Flood Fill experiment made with firstly gradient red-white then overlayed with rainbow gradient with various tolerance.
In PSP there are a number of different effects which are similar to Photoshop like 3D effects, Art media effects, artistic effects, dropshadow etc. The effects allow the user to manipulate the effects to some degree and provide a preview of how their choices affect their image. The effects application process is much more simple than Photoshop but still allow the user (novice or expert) to control the various levels of changes to their artwork with ease.
Multiple image printing in PSP functions similar to Photoshop’s Automate Contact sheet function. Multiple image printing allows the user to print more than one image on the same sheet of paper. This function is quite useful if you need to pick images from different folders to make up your contact sheet. Although this can be quite time consuming if you want a contact sheet of more than 10 pictures, especially if you want to line them up nicely.
Photo manipulation can be applied to any photo in PSP by changing the colours, copy and pasting areas within itself, adjusting the colour “makeup” of the photo using Adjust menu, and using the “effects” in the Image menu.
Within PSP there is also a screen capture function. This feature allows the user to setup screen capture and go anywhere on their computer and select as small or large an area they want to capture. Once the selection is made, PSP instantly reveals the selection which the user made. Most people will be familiar with the easier method using Windows, but it doesn’t capture the cursor and takes a shot of the whole screen. If you use the screen capture in PSP it captures the cursor, if you make the selection of the area and it also allows the user to specify the area size they are after. This is a VERY good function if you want to highlight some detail for say a screencast lesson for example.
That’s most of the features that were covered in the PSP workshops but I’m sure there are a lot more that I haven’t touched on because I haven’t stumbled across it. All in all PSP I think is a good program that allows flexibility and variety without the complication, which can sometimes be confronting in Photoshop. However there are also PSP’s obvious let downs which Photoshop blitzes away! Have a try of PSP and let me know what your opinions are.
Having attended the first workshop called Graphics Fundamentals, I didn’t really learn all that much about the potential of the program so I registered for the next workshop which opened my eyes to what I originally thought was a pretty basic program.
I was quite surprised about some of the features that were available in PSP as I am not familiar with the PSP program. Photoshop is predominately what I work with here in the office.
Firstly, PSP offers the user the option of using vector or raster-based graphics as well as a combination of both in one artwork by letting them choose vector or raster layers. Vector and raster options in PSP make it easier for the user to integrate graphics without having to import their graphics into other programs in order to complete the finished product. However one of the main let downs is that once a shape has been created as a raster image, it remains as it is and the user can only move it around the canvas. If the shape needs to be bigger or smaller they have to do the shape again. If the user uses a vector-based image the user can easily change the size and colour.
Another let down for the raster versus vector in PSP is that photographs and graphics are not easy to combine together. For example, if the user wanted to place a photograph inside a raster star shape the user must resize the original photo before they try pasting it on the canvas. This is because raster layers can not be re-sized. This is a major let down.
PDU Graphics Intermediate exercise although I experimented with putting in a photo.
Users of Photoshop would be familiar with the PSP layout. It has similar palettes such as tools, layers, materials (the equivalent of Photoshop’s foreground and background selections) as well as more palettes that Photoshop users would be accustomed to.
The feature which I found most interesting was in the Materials Palette where the options of colour, gradient, pattern and texture were readily available for the user. These options allow the user to experiment more freely with the numerous presets which are offered in each category. The user can even combine any of the colours, gradient, pattern and texture together. Making customised colours, gradients, patterns and textures is also possible. These combinations can then be used with various tool palette options like airbrush, paintbrush etc. The only let down to this option is that combining presets limits the user to changes later on.
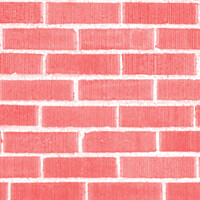
bricks texture with colour red
two patterns mixed together by using the tolerance function
A feature in PSP’s tool palette is what they call picture tubes which are a number of different pictures built into the program which you can use in your image. In essence it is like a rubber stamp. The user chooses the picture and then chooses the scale and step of it on the canvas. One can also make up their own custom stamps which is handy for easily placing small graphics which are intended to be used over and over, or even company logos.
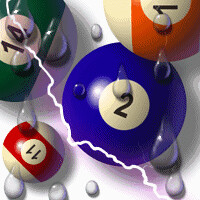
Picture tube experiment. Made up of billiard balls, lightning and waterdrop presets
Another feature in the tool palette which is different to Photoshop is their Flood Fill option which is equivalent to the Paint Bucket in Photoshop. However the Flood fill tool in PSP fills area with not only colour but textures, patterns or gradients! Or even a combination of them all! Don't forget those customised ones as well. The Flood Fill selects the Pixel it is over when the user clicks the mouse and fills it (and any adjoining pixels depending on the tolerance) with the fill type that the user specifies. The tolerance is the amount of pixel space that you want to select from the place you want to click on. The higher the number the larger the selected area.
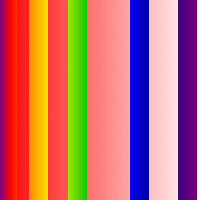
Flood Fill experiment made with firstly gradient red-white then overlayed with rainbow gradient with various tolerance.
In PSP there are a number of different effects which are similar to Photoshop like 3D effects, Art media effects, artistic effects, dropshadow etc. The effects allow the user to manipulate the effects to some degree and provide a preview of how their choices affect their image. The effects application process is much more simple than Photoshop but still allow the user (novice or expert) to control the various levels of changes to their artwork with ease.
Multiple image printing in PSP functions similar to Photoshop’s Automate Contact sheet function. Multiple image printing allows the user to print more than one image on the same sheet of paper. This function is quite useful if you need to pick images from different folders to make up your contact sheet. Although this can be quite time consuming if you want a contact sheet of more than 10 pictures, especially if you want to line them up nicely.
Photo manipulation can be applied to any photo in PSP by changing the colours, copy and pasting areas within itself, adjusting the colour “makeup” of the photo using Adjust menu, and using the “effects” in the Image menu.
Within PSP there is also a screen capture function. This feature allows the user to setup screen capture and go anywhere on their computer and select as small or large an area they want to capture. Once the selection is made, PSP instantly reveals the selection which the user made. Most people will be familiar with the easier method using Windows, but it doesn’t capture the cursor and takes a shot of the whole screen. If you use the screen capture in PSP it captures the cursor, if you make the selection of the area and it also allows the user to specify the area size they are after. This is a VERY good function if you want to highlight some detail for say a screencast lesson for example.
That’s most of the features that were covered in the PSP workshops but I’m sure there are a lot more that I haven’t touched on because I haven’t stumbled across it. All in all PSP I think is a good program that allows flexibility and variety without the complication, which can sometimes be confronting in Photoshop. However there are also PSP’s obvious let downs which Photoshop blitzes away! Have a try of PSP and let me know what your opinions are.
Comments